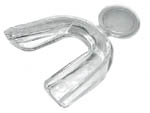
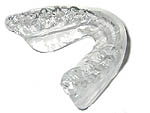
Thermoform whitening Trays
| Before |  |
| After |  |
- Add boiling water to a container large enough to accept the unformed tray and then cool slightly.
- While holding onto the tab on front of whitening tray, soften the whitening tray by submerging it into hot water for 5-10 seconds (you will notice the tray begin to wilt). The whitening tray must be softened enough to properly make a mold of your teeth. NOTE – Overheating may damage or over-shrink the whitening tray.
- Allow the whitening tray to cool just enough to eliminate the possibility of burning your mouth during the molding process. Position the tray over your teeth, bite firmly into the tray and apply pressure with your fingers to the front of the whitening tray. At the same time, press your tongue on the roof of your mouth and such all of the air and water from the inside of the tray. Let the tray cool and harden. Then remove the tray from your mouth. NOTE – You may reheat the tray and repeat steps 2-3 if necessary to attain optimum results.
- After the whitening tray has hardened, place it into your mouth to assure a comfortable fit. If the tray covers too much of your gums or continues past your rear (molar) teeth, you may use scissors to trim the excess material from the tray. If you are satisfied with the results of the fit, use scissors to cut the holding tab off of the front of the tray.
- Repeat steps 1-4 for each whitening tray
Gel Whitening Usage
- Brush your teeth each time before using the dental whitening system. The whitening gel is most effective on clean teeth.
- Make sure that whitening trays are clean and dry before applying whitening gel into them. NOTE – Moisture reduces the efficacy of the whitening gel and slows down the whitening process.
- Apply a small amount of whitening gel around the front interior of the whitening tray is such as way that the gel will completely cover the front surface of your teeth.
- Position the whitening tray over your teeth and press gently so that the whitening gel covers the entire front surface of your teeth. Discard and overflow gel by spitting or wiping it from your mouth. Wear whitening trays from 30 minutes to 3 hours. NOTE – Start slowly and build up your wear-time. You may wear your trays overnight if you have no sensitivities. Longer wear-times create faster whitening results. As an average, optimum results are achieved after 10-30 cumulative hours of wear-time.
- Upon completion of your whitening session, clean the tray(s) with warm water and toothbrush and store in a safe place.
- Conduct your whitening session once per day until desired level of whitening is attained. NOTE – You may skip days between whitening sessions to minimize sensitivities. This will not affect the cumulative whitening process.
Be sure to keep your whitening gel refrigerated when not in use.
Instructions for Refilling Dental Dispensing Syringe from Bulk Container
- Remove plunger and tip cap from syringe barrel.
- Position bulk container opening into the large opening of the syringe barrel. Dispense gel from the bulk container into the syringe until nearly full (do not overfill).
- Replace syringe tip cap first. Then replace the syringe plunger into the syringe barrel (you may need to apply a small amount of force to push syringe plunger past one or two internal ridges (plunger stops) within the syringe.
- Remove syringe tip cap to release any pressure inside the syringe during the refilling process.
- Be sure to refrigerate your whitening gel when not in use.
Warnings: Keep out of reach of children. Pregnant or nursing women consult physician before use.
